Simple Java Program to Upload File to Aws S3

![]()
How to upload a file to AWS S3 in Java (using Vaadin framework)
Nowadays many applications give access to users for uploading images, avatars, audio or video files, etc. Nearly commonly developers choose to store this information on a different cloud services.
While working on ane of my personal projects - Tabata - Fitness App, I've adult an authoritative tool for managing the exercises data in the database. I've done information technology using a sugariness combination of Spring Kicking and Vaadin framework. That's the final consequence:

To upload the video of exercises directly to AWS S3 without the use of AWS console, but with my own authoritative panel, I've developed a custom component based on Vaadin's official upload component.

Here how I've done information technology.
This web log postal service consists of ii parts:
- Configure Amazon service for granting access to only one app to the specific S3 bucket.
- Java code to programmatically upload a file to S3 saucepan.
Amazon services configuration
ane. Create AWS account
You can create it here
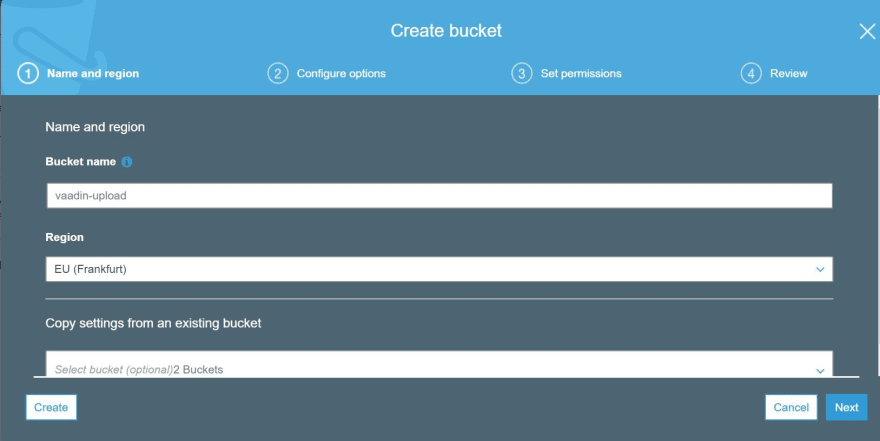
two. Create S3 bucket
In the Services menu in the Storage section find S3:

Press Create bucket button. In the appeared dialog window enter your bucket proper noun, chose the closest to y'all (or your potential visitors) region and press Create.
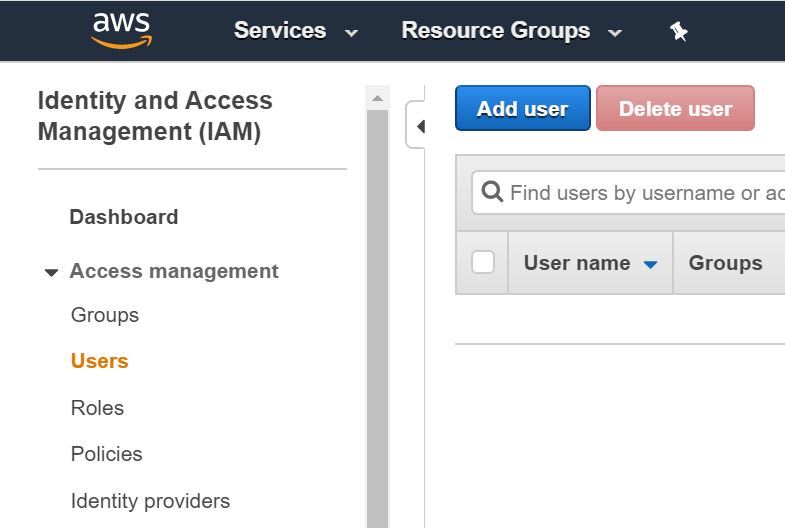
3. Create IAM user
For security reasons, we'll create a new IAM user (which will be our time to come app) and give permissions merely for the app to have access to the created saucepan.
In the Services menu chose IAM then Users under the Access Management department. Press Add user.
Enter username and bank check Programmatic access in the Access blazon section.
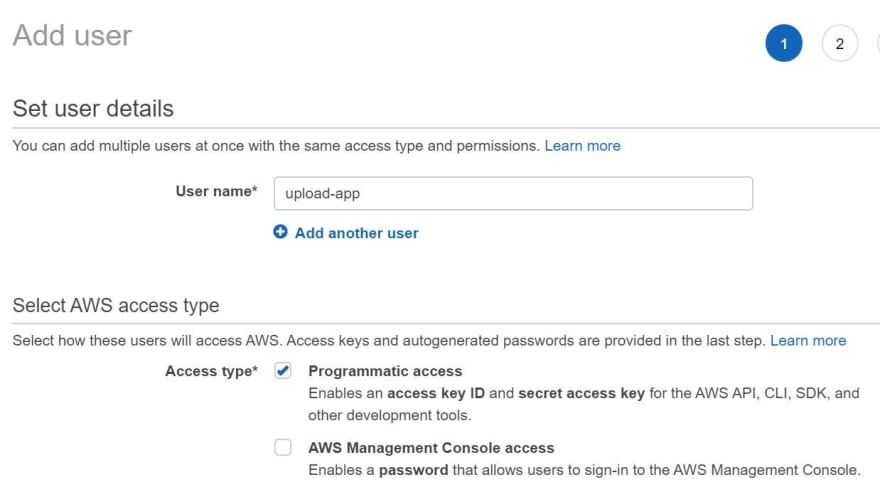
Press Next: Permissions. And then click Attach existing policies directly and Create policy.

Chose JSON tab, then copy and paste a JSON object from the official AWS docs. Don't forget to modify text placeholder in the instance policy with your own bucket proper name.

Press Review policy. Enter the proper name of the policy, description (optional) and printing Create policy.
Go back to Add together user tab in the browser, refresh the page and find in the list of policies our created policy.

Press Next: Tags, Adjacent: Review and finally Create user. Now you tin see the credentials for the user. Download .csv file in social club not to lose the credentials as nosotros'll soon demand them.
Our AWS configuration is done. Let'due south first to code!
Spring Boot and Vaadin part
4. Start Vaadin project
The most convenient style to showtime Vaadin project is to utilize Vaadin Starter.
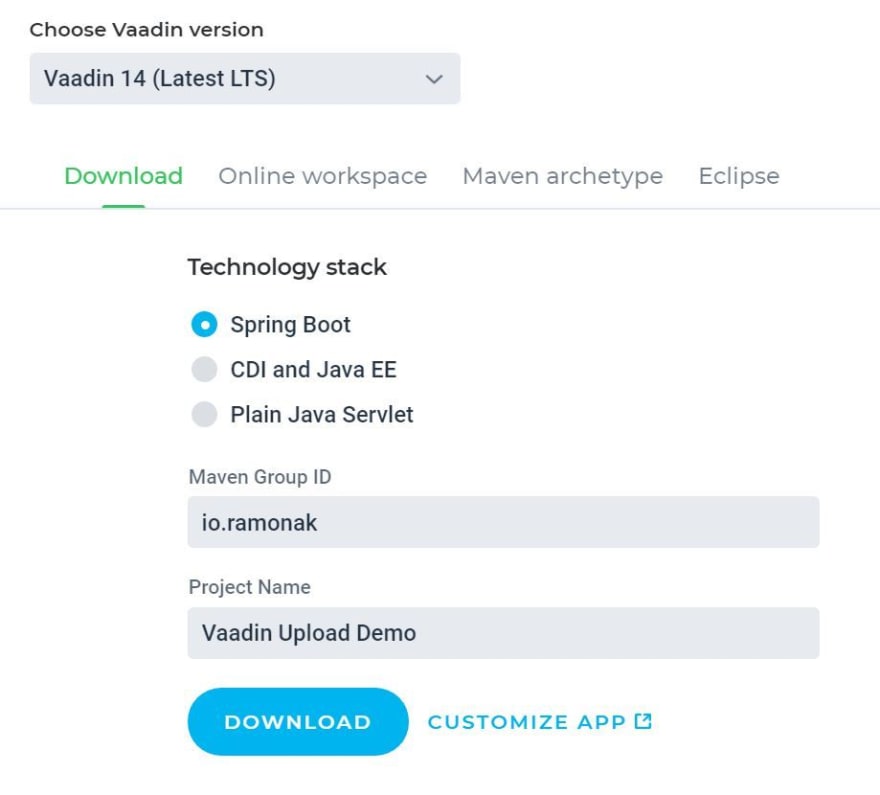
Download, unzip the binder and open it in your favorite IDE.
It'due south a basic Vaadin projection, only it's a fully working app (and it'due south PWA by default).
Delete all demo stuff: GreetService.java and all inside the MainViev.course constructor.
five. Create custom upload component
Create UploadS3.java class:
public grade UploadS3 extends Div { private final MemoryBuffer buffer ; individual concluding Upload upload ; public UploadS3 () { buffer = new MemoryBuffer (); upload = new Upload ( buffer ); add ( upload ); } }
And then add this custom component into MainView course:
@Route @CssImport ( "./styles/shared-styles.css" ) public class MainView extends VerticalLayout { public MainView () { addClassName ( "centered-content" ); UploadS3 upload = new UploadS3 (); add ( upload ); } }
Run the project and navigate in a browser to localhost:8080 (or any other port which you defined in application.properties, I prefer to apply 9999 port):

We can see the default Vaadin's upload component.
6. Configure Amazon Client
First of all, add aws-java-sdk dependency into pom.xml.
<dependency> <groupId>com.amazonaws</groupId> <artifactId>aws-java-sdk</artifactId> <version>ane.11.728</version> </dependency>
Then in application.backdrop file create custom props for AWS credentials and paste the value of Access key ID and Secret access cardinal from downloaded earlier credentials.csv file. Likewise, add a property with the name of a created S3 bucket.
aws.accessKey=XXXXXXXXXXX aws.secretKey=XXXXXXXXXXXXXXXXXXXXXXXX aws.s3bucket.proper noun=vaadin-upload
And so inject these properties' values into MainView class constructor and laissez passer them to UploadS3 component.
public MainView ( @Value ( "${aws.accessKey}" ) String accessKey , @Value ( "${aws.secretKey}" ) String secretKey , @Value ( "${aws.s3bucket.proper name}" ) String bucketName ) { addClassName ( "centered-content" ); UploadS3 upload = new UploadS3 ( accessKey , secretKey , bucketName ); add together ( upload ); }
In UploadS3 class, initialize AmazonS3 customer with provided credentials. And so, for at present, the code of the UploadS3 component is:
public class UploadS3 extends Div { individual terminal MemoryBuffer buffer ; private final Upload upload ; private AmazonS3 s3client ; individual final Cord accessKey ; individual terminal String secretKey ; individual final Cord bucketName ; public UploadS3 ( String accessKey , String secretKey , Cord bucketName ) { this . buffer = new MemoryBuffer (); this . upload = new Upload ( buffer ); this . accessKey = accessKey ; this . secretKey = secretKey ; this . bucketName = bucketName ; initAWSClient (); add ( upload ); } private void initAWSClient () { AWSCredentials credentials = new BasicAWSCredentials ( this . accessKey , this . secretKey ); this . s3client = AmazonS3ClientBuilder . standard () . withCredentials ( new AWSStaticCredentialsProvider ( credentials )) . withRegion ( Regions . EU_CENTRAL_1 ) . build (); } }
At present we need to add functionality for uploading a file into the S3 bucket. For that create the following method in the UploadS3 course:
... private String objectKey ; ... private void uploadFile () { upload . addSucceededListener ( event -> { try { InputStream is = buffer . getInputStream (); File tempFile = new File ( event . getFileName ()); FileUtils . copyInputStreamToFile ( is , tempFile ); objectKey = tempFile . getName (); s3client . putObject ( new PutObjectRequest ( bucketName , objectKey , tempFile )); if ( tempFile . exists ()) { tempFile . delete (); } } catch ( AmazonServiceException | IOException ex ) { ex . printStackTrace (); } }); }
This method creates a temporary file in which the input stream from Vaadin's upload component is copied. And then this file is uploaded to S3 saucepan and deleted after that.
As this method is an outcome listener nosotros'll phone call it in the constructor of UploadS3 class.
public UploadS3 ( String accessKey , String secretKey , String bucketName ) { this . buffer = new MemoryBuffer (); this . upload = new Upload ( buffer ); this . accessKey = accessKey ; this . secretKey = secretKey ; this . bucketName = bucketName ; initAWSClient (); uploadFile (); add ( upload ); }
Let'southward test what we've adult!
Run the app and open up it in the browser.

Information technology looks like the file is successfully uploaded. But let's check it in the S3 console.

Yes! The file is in the saucepan!
If you are trying to upload a file which size is more than 1MB and getting the mistake
org.apache.tomcat.util.http.fileupload.FileUploadBase$FileSizeLimitExceededException: The field file exceeds its maximum permitted size of 1048576 bytes.just increase the limit of the post-obit backdrop in the application.properties file:
bound.servlet.multipart.max-file-size=10MB leap.servlet.multipart.max-asking-size=10MB
BONUS: private access testing
Recollect, when we configured permission policy for the S3 saucepan, we set only programmatic access and only for our app. Let's examination information technology!
First, let's try to open the downloaded file (image in our case) past its URL, which nosotros'll obtain programmatically.
For that we demand to:
- add TextField component in MainView grade, pass it to uploadFile method of UploadS3 component
public MainView ( @Value ( "${aws.accessKey}" ) String accessKey , @Value ( "${aws.secretKey}" ) Cord secretKey , @Value ( "${aws.s3bucket.name}" ) String bucketName ) { ... TextField link = new TextField ( "Link" ); link . setWidthFull (); ... upload . uploadFile ( link ); ... add ( upload , link ); }
- inside of uploadFile method of UploadS3 class set up the URL value of the uploaded file to passed TextField
public void uploadFile ( TextField link ) { upload . addSucceededListener ( event -> { ... link . setValue ( s3client . getUrl ( bucketName , objectKey ). toString ()); ... }); }
Now when we upload the file, nosotros immediately receive its URL.

But if we copy and paste this URL into the browser'south accost bar, we'll get an error:

Access Denied! We can't get the picture, which is fine!
What if nosotros try to obtain it programmatically?
For that, we need to create a method in UploadS3 class which will download the uploaded image from S3 bucket, convert its content to input stream and return byte assortment:
public byte [] downloadImage () { byte [] imageBytes = new byte [ 0 ]; S3Object s3object = s3client . getObject ( bucketName , objectKey ); S3ObjectInputStream inputStream = s3object . getObjectContent (); try { imageBytes = IOUtils . toByteArray ( inputStream ); } grab ( IOException e ) { e . printStackTrace (); } return imageBytes ; }
And so in the MainView class allow'southward add Image component, which volition bear witness the image after information technology's been uploaded (and downloaded):
... private last Image prototype ; ... public MainView ( @Value ( "${aws.accessKey}" ) String accessKey , @Value ( "${aws.secretKey}" ) String secretKey , @Value ( "${aws.s3bucket.name}" ) String bucketName ) { ... image = new Image ( "" , "epitome" ); link . addValueChangeListener ( e -> { byte [] imageBytes = upload . downloadImage (); StreamResource resource = new StreamResource ( "image" , () -> new ByteArrayInputStream ( imageBytes )); image . setSrc ( resource ); add ( image ); }); ... }
Run the app and exam it:
Yeah, nosotros can admission the image via our app!
Conclusion
And that's it! In this blog post, I described a stride-by-step procedure of configuring Amazon S3 saucepan for private admission, uploading a file into the bucket using Java and Vaadin framework, and and then testing the private access permission.
The complete source code of the projection is bachelor in this GitHub repository
Originally posted on my personal blog
Source: https://dev.to/ramonak/how-to-upload-a-file-to-aws-s3-in-java-using-vaadin-framework-1m2m
0 Response to "Simple Java Program to Upload File to Aws S3"
Post a Comment